
Note on this tutorial
I wrote this tutorial many years ago (2001-2002). Because of the large number of links pointing to it I've left it up. However, I no longer support it. Please do not contact me asking for help with QBASIC, ASM, or other programming issues. Also, please do not contact me about minor errors in the text: the text of this tutorial is mostly unedited, and only the presentation and markup have been significantly updated (to valid XHTML 1.0 strict). If there are major errors which significantly interfere with readability, though, please feel free to bring them to my attention - Billy Wenge-Murphy3.5 - Special Segments
We know that all your variables, and all the code that makes up your final program reside in memory. Variables usually in the Data Segment and code, surprisingly enough, in the Code Segment [btw - just like the register DS points to the Data segment, CS points to the code segment. But, let's not worry about that right now]. Well, there are other various specific segments of memory, though they don't have registers associated with them. One of these segments of memory holds all the data for what's stored on the screen. Depending on whether you're using only text, or using graphics, the location may change around. For simplicity right now, we'll talk about text.
Our last program printed text on the screen using an interrupt. In all our previous programs, we didn't specify what screen mode we wanted to use. So by default, it uses a text screen mode. This means that the screen is set up then so you can only put text onto it.
So how do we specify the screen mode? There's an interrupt that'll change the screen mode for us. Take a look at this program:
.MODEL SMALL
.STACK 200H
.CODE
START:
Mov ax, 0003h
int 10h

mov ax, 4c00h
int 21h

END START
You may notice this is a bit different than how the previous programs used interrupts. Here, put a value only in ax. The change screen mode function is function 0 of interrupt 10. So, to use it, we must put 0 in ah. And this function requires that you put the screen mode you want in al. Since ax consists of ah and al, i just moved a value straight into ax. Now ah should contain 00, and al should contain 03. Therefore, we'll call the screen mode function, and change to screen mode 3. Screen mode 3 however, is the default screen mode, so this doesn't accomplish much.
Now that we're absolutely sure we're using the screen mode we
want, we can write stuff to the segment where what's on screen is
stored. This segment has an Absolute Address. This means
that, unlike variables that may change around their address every
single time you run a program, an absolute address is always in
the same place.
The only catch in this case is that with the screen mode, it's a
different absolute address for different screen modes. For the
screen mode we're using, the segment is B800 [That's
hexadecimal of course].
As an example, say we had run that previous program that prints
"I'm a string" on the screen.
The letter "I" would be stored at B800:0000, or offset
0 in segment B800. Actually, it would be a number code for the
letter I. Every letter on the keyboard, along with numerous other
things, have a numeric code assigned to them. We saw this in an
earlier example that put a smiley face on the screen - It's code
was the number 1. Well, the code for the letter I is 73. Not to
be confused with a lowercase i, which has code number 105. It
would be difficult to remember everything in this code - all 256
of them - so just look at this chart:
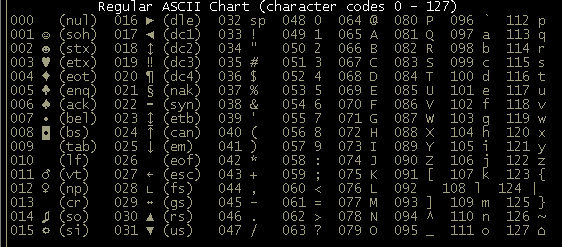
Anyway, the code for "I" would be at B800:0000 - 73
[49 hexadecimal]
The code for apostrophe would be at B800:0002 - 39 [27h]
But why isn't the code for apostrophe at B800:0001? It is only
one byte long after all. And therefore being the second character
on the screen it should be the second byte.
The answer is that text can have different colors. And after each
byte containing a numeric code for a character, there's a byte
with the numeric code of what color that character should be.
Since by default the print string function of int 21 prints with
the color grey, B800:0001 should have the number 7 stored at it -
7 is the numeric color code for grey.
Now let's put all this information to use in this next program:
.MODEL SMALL
.STACK 200H
.CODE
START:
mov ax, 0003h
int 10h

mov bx, 0b800h
mov es, bx

mov bx,0
mov ah, 1
mov es:[bx], ah

mov ax, 0100h
int 21h

mov ax, 4c00h
int 21h

END START
The first two lines are two change to the text screen mode. We covered this further up on this page.
From here, it gets a little complicated. We want to put text
on the screen, so we want to put things into the segment B800.
And the top left corner of the screen, which is essentially the
'beginning' of the screen, is stored at offset 0. We're gonna
need to get a Segment Register to point to the segment we want.
We're going to use ES, which is the 'extra segment'. I'm not sure
exactly, but i don't think it's used for anything specific - i
think it's just an extra segment register used to point to
whatever segment you want, unlike DS and CS which point to your
data and your code.
But since you can't move numbers directly into the segment, we
must put it into a register first. So, we put it into bx with:
mov bx, 0b800h
For one reason or another, you have to put that first 0 on
there. Rest assured, that does actually mean B800 - It sort of
drops that first 0, but it's required.
After the segment's in bx, we put it into ES. Now it gets a
little bit tricky:
mov es:[bx], ah
What exactly does this mean. Well, this is another way that we can move things around in memory. Firstly we know that a segment and it's offset are separated by a colon, so it must have something to do with a segment and offset. ES, since it's on the left side of the colon, is the segment. So instead of saying B800, we can actually put B800 in a register, and tell the computer to look at what's in the register to find what offset we want. Then so far we've deduced that we're trying to put a number at the segment represented by whatever is in es.
Since [bx] is after the colon, it must be the offset that we're moving to. This is similar to what we did with ES. But for registers that aren't segment registers, we must put them in brackets - [] - to specify that we want to use them as an offset. This is a "Mov" instruction, so if we just left bx without brackets, we'd be saying we actually want to put something in bx. So, two lines before this was this line:
mov bx,0
The offset of the upper-left corner of the screen is 0. And if bx is acting as our offset, we should make bx equal 0. So all in all, we now know what this command means:
mov es:[bx], ah
It means 'move' what's in ah to the segment and offset that es and bx point to. And ah contains 1 - this is the numeric code for the smiley face character of text.
These next 2 lines are also new:
mov ax, 0100h
int 21h
This interrupt waits for you to hit a key. That way you can have a chance to see what happens when you run the program.
4.1 - Loops & Line Labels
Line Labels are a very simple idea. When you use
a label, you give a name to a specific part of the program.
As you'll see later, you can use this name to jump around in your
program - In fact, it'll also come in useful right now.
What if in the last program you didn't want to print just 1 smiley face on the screen. Say you wanted to print 100. Well, it would be a very long program, because you would constantly have to change bx - you'd have to add 2 to it every time you wanted to print the smiley face in a different place. This isn't necessarily true. By using what's called a "loop" we can print those 100 smiley faces by only adding a couple of lines of code. Let's see what this new program would look like:
.MODEL MEDIUM
.STACK 200H
.CODE
START:
mov ax, 0003h
int 10h

mov bx, 0b800h
mov es, bx

mov bx, 0
mov ah, 1

mov cx, 100

startloop:
mov es:[bx], ah
add bx, 2
loop startloop

mov ax, 0100h
int 21h

mov ax, 4c00h
int 21h

END START
This new program makes use of the 2 new things we're learning here. Firstly, startloop: means that that line in the program is called startloop. Like a variable, you can call a label almost anything you want. Make sure that you're aware of the colon after it - this is what clarifies for the compiler that it's a label.
What a loop basically does is does a set of instructions over
and over again. To make a loop we start with a label. This will
be the start of the loop (BTW: A label doesn't always have to
start a loop, it can just be a label for a part in your program.
But in this case, it does start the loop). Then we put the
instructions to be repeated on the lines after the label. When
we've typed all the lines that should go in the loop, we need one
more line to close the loop. This is the command LOOP.
Notice that here it says Loop startloop. We must tell where we
want to loop back to. Since startloop is the beginning of the
loop in this case, then we should use Loop startloop.
We probably don't want the loop going on forever, so there must
be some way to specify how long the loop lasts - there is. CX is
used as the loop counter. Before the start of the loop,
you must put a number in cx. Then, every time your program runs
across the command LOOP, it subtracts one from cx before looping.
If cx is 0, then the loop ends.
That's really all there is to the loop command.
Now, just one more thing we added to this program. Inside the loop is this:
add bx, 2
This pretty much explains itself - it adds the number 2 to bx. Recall that bx will point the offset 0 at the beginning of the program. And this loop is going to be done 100 times. We don't want it to put the smiley face character at offset 0 100 times; By adding 2, bx points to the offset of the next character on the screen.
4.2 - Doing something useful: Graphics
Up until this point, we've used only the text mode for output. This is all well and fine for learning purposes but not particularly useful. So now it's time that we used one of the screen modes suited towards graphics. This is mode 13h. It has a resolution of 320x200x256. That means 320 pixels wide, 200 pixels tall, and 256 colors on screen at once. Though not great, it can do some pretty nice graphics. It's a start anyway. DOS has some interrupts for dealing with graphics, but there's no point in using them because drawing pixels to the screen is very easy. It's very much like the last section.
In the previous section, the screen started at offset 0 of segment B800. Likewise, the segment for mode 13 starts at offset 0 of segment A000. Also in the previous section, we potentially had to write 2 bytes per character. In this mode, each byte of data written to the screen will draw only one pixel [a dot]. So, all data is only a color - because, a dot always looks like a dot, there's nothing else to store but the color of the dot. Let's see an example program for drawing some pixels:
MODEL MEDIUM
.STACK 200H
.CODE
START:
mov ax, 0013h
int 10h

mov bx, 0A000h
mov es, bx

mov bx, 0
mov ah, 1

mov cx, 64000

startloop:
mov es:[bx], ah
inc bx
loop startloop

mov ax, 0100h
int 21h

mov ax, 4c00h
int 21h

END START
Surprised? It's almost the exact same as before but with minor changes for mode 13. Now we use
mov bx, 0A000h
mov es, bx
because the screen starts at segment A000. Also, the loop counter has been changed to
mov cx, 64000
That's because this program is intended to fill the whole
screen with dots. Since there's 320x200 pixels, do the math: 320
* 200 = 64000 [note that * is used as a symbol for multiplication.
FYI, when typing * usually denotes multiplication, / for
division, and ^ for exponents: 2^3=8, and so on...].
Then, the loop itself is much the same. Move a byte to A000, add
to bx to go to the next offset, loop again. Notice that
inc bx
is used in place of
add bx, 2
because we want to put a byte in every single offset, since every single offset corresponds to a pixel. Inc bx then, adds only one to bx. INC can be thought of as INCrememnt or even INCrease, if it helps.
add bx, 1
would have been valid here too, but i think inc is faster, and it's just good programming technique to do the more logical thing. Likewise, this would work:
inc bx
inc bx
in place of the add bx, 2 in the previous example, but why when you can just use add!?
Well, i know that that blue screen is ultra exciting. Let's try drawing the whole screen, but with all 256 colors at once to make it more interesting. Simply add this after inc bx:
inc ah
So, first time through the loop we draw a blue pixel. Then we move to the next pixel and draw one with color 2, the next with color 3, and so on. I'm fairly sure that when you use an inc for a register that's already at it's max value - hence, using inc when ah = 255 - that it loops back around to 0. This is how it turned out for me, anyway. You should see a colorful pattern on your screen when you run this.
4.3 - A faster way
Now we'll look at a quicker, cleaner way at filling the screen with pixels. We do this with the command STOSB. Stosb is used for exactly what we did in the last program - storing bytes at a location in memory. To use it, we must first set where to store the bytes. This is stored in ES:DI. Then it's just a matter of putting a value in al and calling STOSB.
START:
mov ax, 0013h
int 10h

mov bx, 0A000h
mov es, bx

xor di, di
xor al, al
mov cx, 64000

Startloop:
stosb
inc al
loop startloop

mov ax, 0100h
int 21h

mov ax, 4c00h
int 21h

END START
Well, same exact thing, but faster (i believe). It's not too noticeably faster, but when used over and over as part of a program it would pay off. This tutorial, as you can maybe tell, is leading towards the parts of ASM programming that will help you design games, which is mostly what I use it for, so it's the easiest for me to write about. Next, we'll get into drawing "sprites". A sprite is basically just a little image, like a person, enemy, ship, etc depending on what kind of game it's in. Our sprites will be stored in files and loaded in, so we'll need to load them in. This means learning how to open and read files.
4.4 - Graphics from file
Before we go onto to getting graphics from a file, let's try saving graphics in a file. Files aren't too hard to use. First we must open a file. Then, of course, we'll need the filename to do that. From there opening the file is just a matter of passing a few things to an interrupt. So to start, this should be in the DATA part of the program:
Filename db "spryte1.grh",0
Recall that db can be thought of as declare byte(s). Each character is a byte, and so is the number zero at the end. 0 is used as a terminator for the string. Much like printing text needs a $ at the end of the string, a filename must end in a 0 or 'null' character - It's therefore referred to as 'null terminated'. Notice that that line is NOT
Filename db "spryte1.grh0"
When the 0 is inside the quotes it becomes text. It's no
longer a terminator because instead of being 00h in hex, it's 40h.
Now it's part of the filename instead a terminator of the string.
For simplicity, I have a sprite made for our program to load onto
the screen. Download it before moving
on.
Our program so far should look like this:
.MODEL MEDIUM
.STACK 200H
.DATA
Filename db "spryte1.grh",0
.CODE

START:

mov ax, 0013h
int 10h

mov ax, @data
mov ds, ax
Next, let's open the file. First, add these two lines to the data part:
Filehandle dw ?
Filebuffer db 256 dup (?)
When we open a file, it'll give us a number called a 'handle'. This way, whenever we want to read, write, etc with the file, we just use the number associated with the open file instead of giving it the entire filename again. We can 'open' many files at once, meaning we have access to them and no other programs do. So, we technically could have many different handles, one for each file. For now though, we only need this one. Filebuffer is where the contents are stored. We have this variable in order to actually load the file, making it quicker and easier to look at it's contents, rather than reading the file every time we need data from it.
You may wonder though what 'dup' is. Dup can be thought of as
DUPlicate. Since we want a 256 byte long chunk of memory, we
would normally have to write:
Filebuffer db 0,0,0,0,0,...... and so on, 256 times. Well, dup
says duplicate the byte (in this case we don't specify exactly
what value, we just put a ? to say that it doesn't matter, and
the assembler i think will reserve the space leaving whatever
used to be there) 256 times. Notice that the 256 comes before
DUP, and the value to DUP after it in parenthesis ().
So, we have a place to but the handle and data, so let's get to
it and open the file. The interrupt for opening a file is again
int 21h, and it takes a few parameters.
AH = 3Dh specifies that we want to open a file
AL = the mode to open it in. Read only, write only, or both read
and write.
We'll make AL=0, meaning read only. We can't change it
while it's open for read only, but that's okay because we only
want to load it.
DS:DX = Seg and offset to string holding the filename, an idea
we're familiar with already.
So, just a few simple lines to open it:
mov ax, 3d00h
mov dx, OFFSET filename
int 21h
mov filehandle, ax
And it 'returns' the file handle to ax, meaning that it
puts it in a register after it's done. We don't get to pick the
handle, it decides for us. So, we just move ax, which now
contains the handle, into our variable filehandle. Since we'll
obviously need to use ax many more times throughout our program,
the handle can't stay there.
Next, it's just another interrupt to read from our newly opened
file.
AH = 3Fh specifies we want to read from the file.
BX = Handle. We must put the handle here to tell which file to
read from
CX = how many bytes to read. in this case, 256 (16 pixels across,
16 down, 1Bpp - byte per pixel)
DS:DX = seg + offset of place to load to.
So, just another little segment of code:
mov ax, 3f00h
mov bx, filehandle
mov cx, 256
mov dx, OFFSET filebuffer
int 21h
Now that it's loaded, we'll introduce you to something very similar to what we just covered. It's a command called MOVSB. It's like STOSB, but it MOVeS Bytes around in memory. So, we'll move from the 'buffer' to the screen. To use this, we give an address to move to, and one to move from. DS:SI points to source, or where to move from. ES:DI will point to the destination, or where to move to. So, we'll point DS:DI to Filebuffer, and ES:DI to the screen:
mov si, dx
mov ax, 0a000h
mov es, ax
xor di, di
The first line is just a little short cut, because DX still contains the offset of Filebuffer from before. Ds already points to the right segment, no need to change it. xor di,di points di to the first pixel of segment 0a000h, the screen by making it 0. This is also a shortcut to
mov di, 0
I know I haven't introduced the stack, PUSH, and POP, but
just bear with it because they're necessary for this. Sometimes
it's better to omit a few smaller details until later in order to
move to the bigger stuff quicker. For now, just think of PUSH as
saving a register temporarily, and POP as getting that value back.
Things that are PUSHed go onto the 'stack', and they're 'POPped'
off of there as well. I'll go into detail of this later...
Anyway, this bit of code is a bit tricky:
mov cx, 16
startloop:
push cx
mov cx, 16
rep movsb
add di, 304
pop cx
loop startloop
Our loop draws one line, so we start by setting the loop
counter in cx to 16. Then inside the loop we need to use cx again
as a different counter, but it's already the loop counter! Well,
we use PUSH CX to save it on the stack. Now, we can get back what
value it had before the end of the loop so the loop will work. We
want to move 16 bytes (one line) from the buffer to the screen.
We set CX again to 16, and use REP MOVSB. What is rep? It means,
"repeat the next instruction however many times CX says to".
Now this is a little tricky as well: Each time we do MOVSB, it
moves a byte, and automatically increases DI and SI by one. So,
after 16 times, DI has changed by 16. There's 320 pixels in a
row, and we want to point it to the next row before we draw it,
so let's do the math: 320 - 16 = 304. By adding 304 to di, we
point it to the first pixel of the next row down.
The final command POPs CX back, making it have whatever value it
had last time it was pushed. You'll notice though that it's
POPped, then we loop and immediately PUSH it again! What good
does this accomplish? Well, be sure to remember that when loop,
CX is decreased by one. At the start of the loop then, it's
pushed as 16, then we pop it, still 16, and loop. It's decreased
before we loop, and pushed as 15, and so on and so on.
REP also decreases CX by one every time it REPeats the
instruction, that's why we must store and retrieve CX - it needs
to be used as two separate loop counters. If we didn't PUSH it,
the first time through CX would be 0 at the end of the loop
because REP brought it down to 0.
So, finally, we have just these lines to wait for a key allowing
us to see the sprite, and then to exit:
finish:
mov ax, 0100h
int 21h
mov ax, 4c00h
int 21h
END START
And that's it! When you run it, you should see a little Mario sprite in the top left corner of the screen. However, there's something wrong with him. His colors aren't right. Well, that's another topic VERY VERY important to graphics called the 'Palette'. And that's what we'll discuss next.
Links
Quick links to all parts of these tutorialsAsm Tutorial: Learning Assmbly - part [1] [2] [3]
QBASIC Tutorial: Programming in (Q)BASIC - part [1] [2]
